As the cold winter months settle in, it’s the perfect time to switch up your nail game with some fresh and festive designs. Winter nail art is all about embracing the cozy, sparkling vibes of the season, and in 2024, we’re seeing everything from bold, rich colors to delicate, icy accents.
In this post, we’ll share some of the best winter nail ideas for 2024. Whether you're getting ready for holiday parties or just want to add a touch of winter magic to your everyday look, there are plenty of creative nail designs you can easily recreate at home. With simple tips and tricks for achieving these looks on your own, you'll be ready to flaunt your winter nails with confidence all season long!
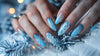
Winter Nail Art - Delicate Snowflake
There's something truly magical about snowflakes, and incorporating them into your winter nails brings a touch of elegance and whimsy to your look. Delicate snowflake designs are perfect for the season, reminding you about the beauty of a fresh snowfall - they make for a stunning winter nail art choice.
Step-by-Step Guide
- Base Coat: Start with a soft, neutral base color like pale blue, white, or a subtle pink nude. These shades allow the snowflake design to pop while maintaining that delicate winter aesthetic.
-
Designing Snowflakes: Use a fine nail art brush or a stamping plate to carefully draw intricate snowflake patterns. You can focus on a few large snowflakes on each nail, or scatter smaller ones across the design. The key is precision and creating a design that looks airy and light.
-
Add Some Sparkle: For an extra frosty effect, consider adding silver or fine white glitter to accentuate the snowflakes. You can add a light dusting of glitter around the edges or in the center of the snowflakes for a more 3D effect.
-
Top Coat: Finish with a clear top coat to seal in your design and add extra shine. This will also help your snowflakes last longer and ensure that they stay intact throughout the winter season.
Tips for Success
- If you're new to nail art, a stamping plate with snowflake designs can make the process much easier and result in cleaner lines.
- To create a more dramatic effect, try layering the glitter with multiple coats for depth, especially around the snowflakes.
- Remember that less is more when it comes to snowflakes – the goal is a light, delicate look that mimics the beauty of real snow.
This design is perfect for those who want to wear winter-themed nails without being too bold. Snowflakes evoke the peacefulness and charm of winter, making them ideal for both casual winter days and festive occasions alike.
Winter Nails: Starry Night
If you’ve ever been mesmerized by the beauty of a clear, starry night during the winter months, this winter nail design idea brings that same enchanting experience right to your fingertips. The Starry Night design captures the essence of a sparkling winter sky, with deep, dark shades contrasted by scattered stars and a touch of shimmer. This nail art is perfect for those who want a bold yet sophisticated winter look.
Step-by-Step Guide
- Base Coat: Begin with a dark, rich base color, such as navy blue, deep purple, or black. This dark background will help the "stars" really pop and create that galaxy-like effect.
-
Creating the Galaxy Effect: Use a sponge to dab on different shades of blue, purple, and even a hint of silver to mimic the gradient effect of a night sky. Gently blend these colors to create depth and dimension.
-
Adding the Stars: Using a small dotting tool or a fine brush, carefully apply white or silver dots to represent stars. For added drama, you can make a few stars larger or create constellations. Don't forget to add small streaks of white or silver to simulate shooting stars.
-
Top Coat: Finish with a clear top coat to seal your design. This will also give your nails a smooth, glossy finish and ensure the stars stay intact.
Tips for Success
- For a more textured effect, consider adding a bit of fine glitter or shimmer over the galaxy to mimic the twinkling effect of stars.
- To create an even more intricate design, you can add a few crescent moon shapes for an additional celestial touch.
- If you're new to this design, use a sponge for a more blended, soft gradient look—it's a great way to practice without being overly precise. Alternatively, you can use a dark blue or black glitter nail polish and paint the stars yourself.
The Starry Night design is ideal for anyone who loves a bit of drama on their nails while still keeping things festive and seasonal. It's perfect for winter holidays, New Year's Eve, or just as a dazzling way to embrace the beauty of the winter sky.
Silver Glitter Winter Nail Art
Nothing says festive like a little sparkle, and silver glitter nails are the ultimate way to add some glam to your winter look. Perfect for holiday parties, New Year's celebrations, or simply embracing the season’s twinkling atmosphere, silver glitter nails are dazzling, versatile, and extremely easy to do at home.
Step-by-Step Guide
- Base Coat: Start with a neutral base color such as a light gray or white to create a backdrop that complements the glitter. This will help the glitter pop and stand out beautifully.
-
Applying the Glitter: For a stunning silver glitter design, use either a silver glitter polish or loose glitter for a more dramatic effect. You can apply it to the entire nail or focus on the tips or edges for a subtle ombre effect. Use a sponge to press the glitter into place for a smooth, even coat.
-
Layering the Glitter: For a more intense glitter look, build up the glitter with several layers. Start from the cuticle and blend towards the tip for a seamless, graduated effect. You can also mix in other colors, like iridescent flakes or small pieces of foil, to give the design depth and texture.
-
Top Coat: Finish with a generous layer of top coat to seal the glitter and add extra shine. This will also help smooth out any rough spots left by the glitter for a flawless, glossy finish.
Tips for Success
- Be patient with layering the glitter. The key to a smooth and even finish is ensuring each layer dries completely before adding the next.
- If you're using loose glitter, try using a cosmetic sponge to press the glitter onto the nail to avoid a mess.
- For a more polished, sophisticated look, keep the rest of your manicure minimal—let the glitter be the star of the show.
Silver glitter nails are perfect for those who want to make a statement with their winter nail art. Whether you’re celebrating or just embracing the season’s sparkle, this design is the ultimate winter nail inspo for adding some serious shine to your fingertips.
Reverse Blue French Winter Nails
If you’re looking for a modern twist on the classic French manicure, the Reverse Blue French design is a chic and fresh option for winter. This look flips the traditional French tips on its head, featuring a bold blue accent at the cuticle instead of the tips. The addition of soft gradients and glitter makes this design both stylish and playful, ideal for the winter season.
Step-by-Step Guide
- Base Coat: Start with a nude or light pink base color to create a soft, neutral backdrop for the blue accents. Allow the base to dry completely.
-
Creating the Blue French Line: Using a fine nail art brush or striping tape, carefully apply a smooth blue line at the cuticle area. The blue should be bold but not too thick, creating a clean, sharp line. If you want a gradient effect, gently blend the blue nail polish into the nude base.
-
Adding Glitter: To give the design a frosty, winter feel, apply silver or iridescent glitter to the tips or around the blue French line. This adds an extra sparkle, reminiscent of snow and ice.
-
Top Coat: Finish with a gel-like top coat to seal the design and add a shiny, smooth finish.
Tips for Success
- If you're unsure about the French line’s precision, use striping tape to ensure a neat and straight design.
- Experiment with different shades of blue, such as pastel or deeper tones, for a personalized look.
- For a more festive touch, add tiny rhinestones or crystals at the base or around the blue line for extra sparkle.
The Reverse Blue French manicure is a unique, modern take on the French style, offering a fresh, winter-ready look with just the right amount of sparkle. It’s simply bound to give your nails a stylish pop of color and a fun winter twist.
Red Ombre Winter Nails
For a bold and festive look this winter, the Red Ombre design is a stunning choice. This gradient effect combines the warmth of red with a smooth transition to a neutral base, creating an eye-catching manicure that’s perfect for the holiday season.
Step-by-Step Guide
- Base Coat: Start with a neutral or nude base coat. This will act as the foundation of your ombre effect, ensuring the red blends beautifully.
-
Creating the Ombre Gradient: Choose a vibrant red polish and apply it to the tips of your nails. Using a makeup sponge, gently dab the red onto the nails, blending it down toward the cuticles. The idea is to have the color gradually fade into the nude base, creating a seamless transition.
-
Adding Detail: To enhance the ombre effect, you can add a layer of fine glitter or shimmer near the tips of your nails. This will give your nails a festive, frosted touch and make the red even more striking.
-
Snowflake Accents: For a true winter vibe, add delicate white snowflakes or dots using a fine nail art brush. These should be placed near the tips or scattered around the gradient to add an extra layer of holiday cheer.
-
Top Coat: Finish with a clear top coat to seal in the design and add a glossy, smooth finish. This will also help your ombre effect last longer.
Tips for Success
- Use a makeup sponge to easily blend the red color. This helps create a smoother gradient and prevents harsh lines.
- For a more subtle effect, focus on blending the red to the middle of the nail instead of all the way to the cuticle.
- Experiment with adding small embellishments, like rhinestones or tiny gems, to make your Red Ombre nails even more festive.
The Red Ombre nail design is the ultimate way to showcase rich, warm colors while embracing the winter season. With its elegant fade from deep red to nude, accented by delicate snowflakes and shimmer, this design is perfect for anyone who wants to turn their nails into a winter masterpiece.
Final Thoughts
Winter is the perfect time to get creative with your nails, and with so many stylish options available, there’s no better way to express yourself this season. Whether you’re looking for something bold, subtle, or sparkly, there’s a design to match every mood and occasion. With a little practice and the right tools, you can easily achieve beautiful, festive nails right at home.
If you want to find the perfect shades for your next manicure, be sure to check out our full nail polish collection and explore our blog section for even more tips and ideas to keep your nails looking fabulous all season long!


